SPIRIT WebReviewer Tool Guide
This page provides basic how-to information on essential review tasks in SPIRIT, the STScI web application that facilitates the TAC proposal review process.
On this page
If you are experiencing issues with SPIRIT, please contact the TAC Technical Manager, your SPD Panel Manager, and/or your PSS.
Getting started
Browser compatibility
SPIRIT is tested in up-to-date versions of Google Chrome and Mozilla Firefox, but aims to be compatible with any reasonably recent version of the world’s four major browsers (Chrome, Safari, Edge, and Firefox). SPIRIT is unlikely to function as intended in browser versions that are more than a few years out of date.
SPIRIT does not explicitly support mobile devices at this time, but will likely work fine on larger mobile devices such as tablet computers.
Application Sign-In
Instructions on how to sign in to the SPIRIT WebReviewer tool are provided in this section.
Step 1
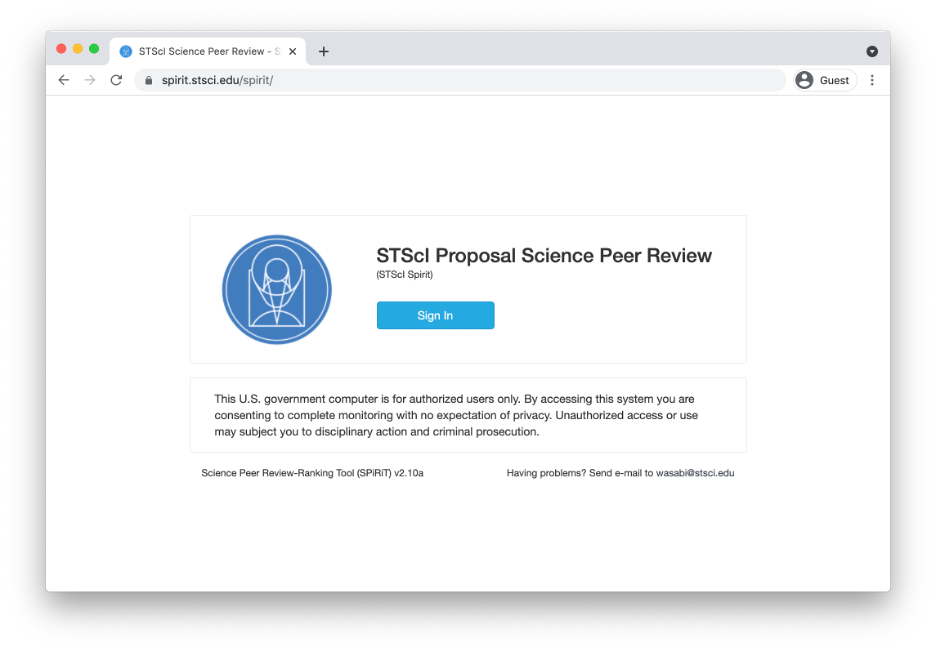
Go to https://spirit.stsci.edu/ and click the button labeled Sign In.
Step 2
Enter your user ID and your password in the appropriate fields. This will be your MyST Account Login credentials.
Step 3
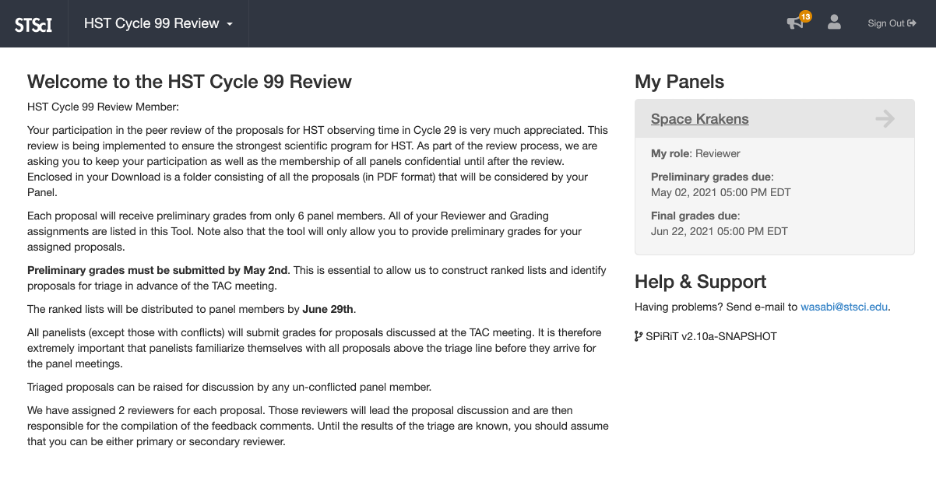
Upon successful sign-in, you will arrive at the review meeting Welcome Page.
This page has a welcome message that typically includes important information about the review meeting. It also has a list of your panels.
You can return to the Welcome Page at any time by clicking the review meeting name in the top navigation bar.
Viewing SPIRIT Notifications
Step 1 — Viewing notifications in SPIRIT
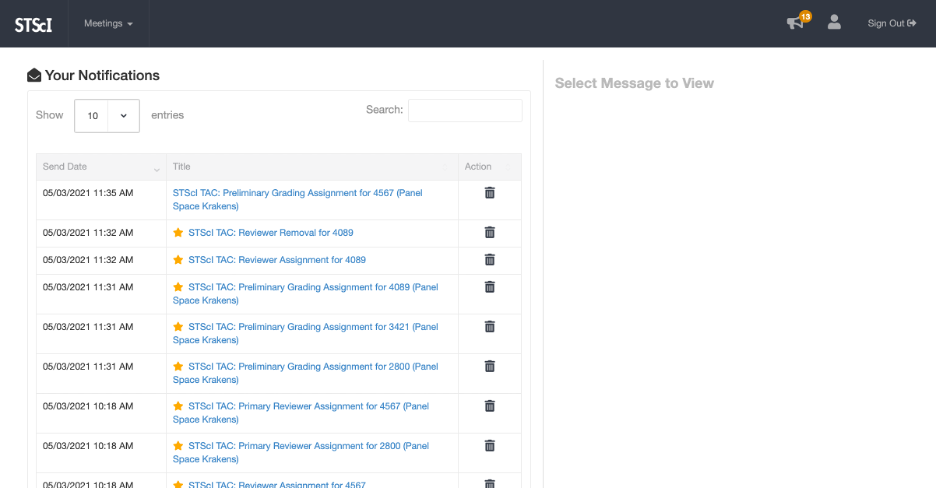
SPIRIT has a Notifications feature for receiving messages from panel PSS and TAC administrative staff relating to the review meeting. You may also receive automated messages from SPIRIT about changes to your assignments.
The main navigation bar at the top of the page has an icon of a megaphone. When you have unread notifications, this icon will also show an orange circle with a count of your unread notifications.
Click the megaphone icon to navigate to the Notifications Page.

Step 2 — Reading notification messages in SPIRIT
The Notifications Page view displays an email-like interface for viewing notifications. Incoming messages are listed in the table on the left. A star icon next to a notification’s title indicates that it is unread.
Click the title of a notification to view its message, which will mark it as read.
Click on the figure for a larger view.
Viewing Panel Assignments and Resources
Step 1 — Welcome Page
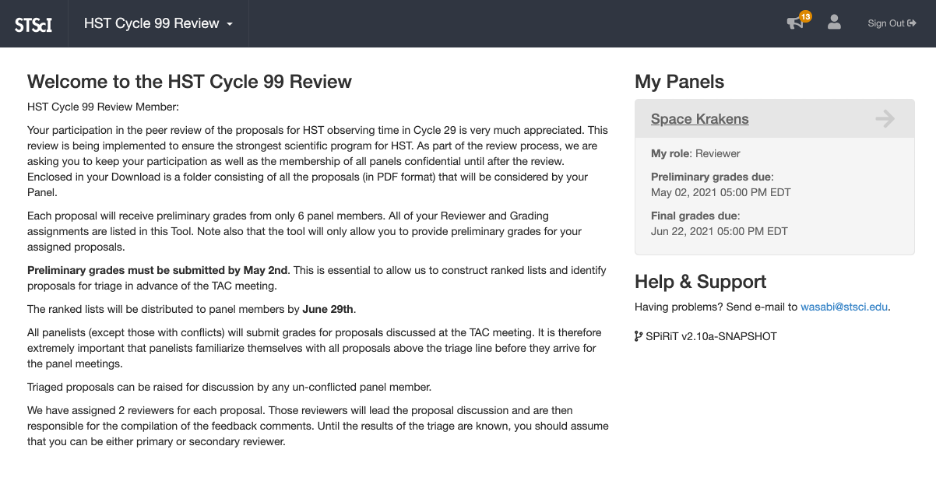
Start at the review meeting Welcome Page. This is the page you start at after first signing in to SPIRIT. You can also get to this page by clicking the review meeting name in the navigation bar at the top of the page.
Click on the figure for a larger view.
Step 2 — Panel Overview Page
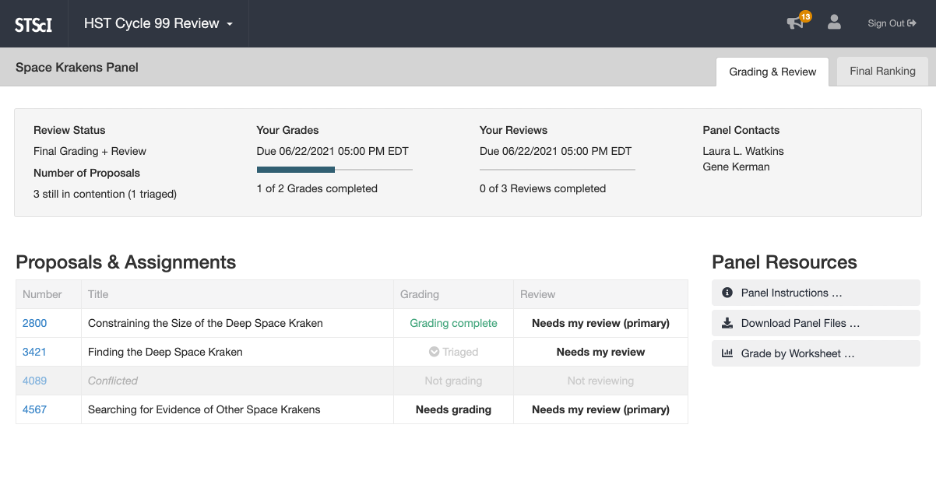
Click on one of your panels in the My Panels section in the Welcome Page. This takes you to the Panel Overview Page for that panel:
Click on the figure for a larger view.
Step 3 — Proposal assignments and panel resources
Words in bold are GUI menus/
panels or data software packages;
bold italics are buttons in GUI
tools or package parameters.
The Panel Resources section provides resources you may find helpful during the review:
- The Panel Instructions button, if present, will show any special instructions for this panel, or additional information not covered on the Welcome Page.
- The Download Panel Files button, if present, provides access to downloads such as a ZIP file containing PDFs of all of the proposals.
- The Grade by Worksheet button allows downloading and uploading grading worksheets for panelists who choose to do their grading that way.
Navigating and Viewing Panel Proposals
Step 1 — Panel Overview Page
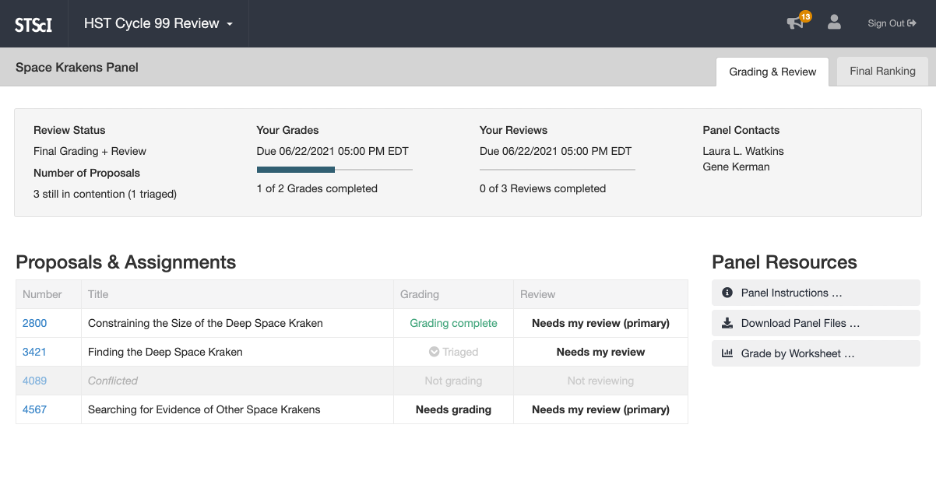
Start at the Panel Overview Page for a panel. You can get here from anywhere in the application by first clicking on the name of the review meeting in the navigation bar (which brings you to the review meeting Welcome Page), and then clicking one of the panels in the My Panels section on that page.
Click on the figure for a larger view.
Step 2 — Viewing a specific proposal
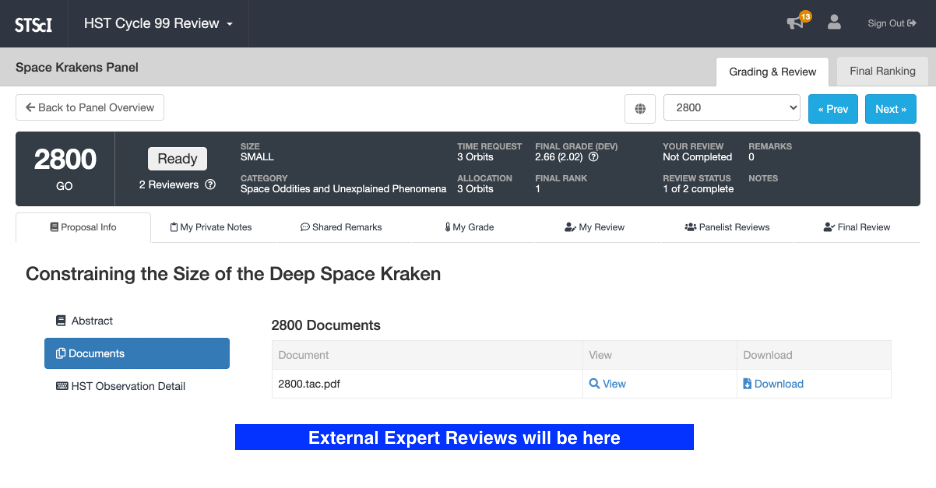
To view a specific proposal, simply click on its proposal number in the Proposals & Assignments table. This brings you to the Proposal Page for that proposal:
Click on the figure for a larger view.
Step 3 — Viewing a proposal's information
Words in bold are GUI menus/
panels or data software packages;
bold italics are buttons in GUI
tools or package parameters.
- Abstract/Observing Description: The proposal’s abstract
- Documents: A table of documents for this proposal, with links to view and download each. Typically there is only one document, which is a PDF of the proposal.
- JWST Observation Details: Details about the requested observation time, coordinated observations with other observatories, and various other data.
If and when a proposal is de-anonymized, there will also be an area here labeled “Investigators” that lists the proposal’s investigators and their respective institutions. (Note that de-anonymization only happens after the final rankings are locked, and only for top-ranked proposals in certain types of panels.)
Step 4 — Viewing the next proposal
When you are ready to view a different proposal, look for the Proposal Navigation Bar near the top of the page:

- Click the Back to Panel Overview button to return to the Panel Overview page, where you can click on a different proposal number in the Proposals & Assignments table.
- Use the drop-down menu of proposal numbers to navigate directly to another proposal based on its proposal number.
- Click the Prev or Next button to navigate to the previous or next proposal (in numerical order by proposal number), respectively.
There is also a button to the left of the drop-down menu that you can click to toggle which proposals the drop-down and Prev/Next buttons navigate among. In the default mode, indicated by a globe icon, those controls navigate among all proposals in the panel. In “filtered” mode, indicated by a funnel icon, those controls navigate only among the proposals where you are assigned as a primary or secondary reviewer.
Grading by Worksheet
Grading is an essential part of determining whether proposals meet the necessary standards to be awarded observation time. SPIRIT provides two methods for entering proposal grades: individually on each proposal’s Proposal Page in SPIRIT, or in bulk via a spreadsheet known as a “grading worksheet”. This documentation page covers the latter.
Note that for some panels there are two phases of grading: preliminary and final. Both methods of grading are available during both phases. However, each phase uses a different grading worksheet (because your grading assignments are generally different in each phase).
A grading worksheet will reflect your grading assignments at the time you downloaded it. If your grading assignments change, we recommend you upload your old grading worksheet and then download a new one.
Step 1 — Open the Grade by Worksheet window
Words in bold are GUI menus/
panels or data software packages;
bold italics are buttons in GUI
tools or package parameters.
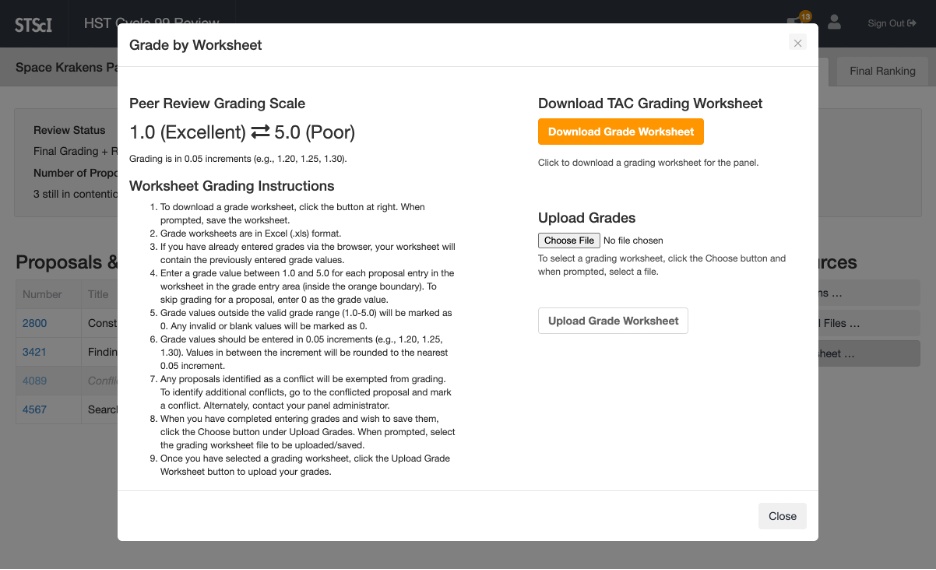
On the Panel Overview Page, click the button labeled Grade by Worksheet. You will find it in the Panel Resources section. This opens the Grade by Worksheet window.
Click on the figure for a larger view.
Step 2 — Download a Grading Worksheet
In the Grade by Worksheet window, click the button labeled Download Grade Worksheet. This is a normal file download, so depending on how you have your browser configured it will either save the file in a default location or prompt you to choose a location to save the file.
Any grades you have already entered (in the current grading phase) will be included in the downloaded worksheet.
Step 3 — Enter your grades in the Grading Worksheet
The grading worksheet is a spreadsheet in XLSX format. You can edit it in Microsoft Excel, or another program that supports the XLSX format such as OpenOffice and LibreOffice.
The grading worksheet itself includes further details on entering grades, such as the grading scale and grading considerations.
Step 4 — Upload your Grading Worksheet
When you are ready to upload your grading worksheet, return to the Panel Overview Page for the panel and open the Grade by Worksheet window as described in Step 1.
In the Upload Grades section of the window, click the button labeled Choose File (or something similar, depending on your browser). Your browser will prompt you to choose the grading worksheet file you wish to upload from your computer.
Once you have selected the file, click the Upload Grade Worksheet button. It may take a few moments for the upload to be processed, but when is complete you should see the text “Grades imported” appear in green next to the button.
When you close the Grade by Worksheet window, the page will automatically refresh to reflect the new status of your grading assignments.
Entering A Proposal Grade
Step 1 — Navigating to a proposal
Start by navigating to the proposal to be graded, as documented in Navigating and Viewing Panel Proposals.
Step 2 — The My Grade tab
Words in bold are GUI menus/
panels or data software packages;
bold italics are buttons in GUI
tools or package parameters.
The left side of this tab is the grading form, where you enter your grade values. The right side of the tab provides information about the grading scale and a description of the grading considerations.
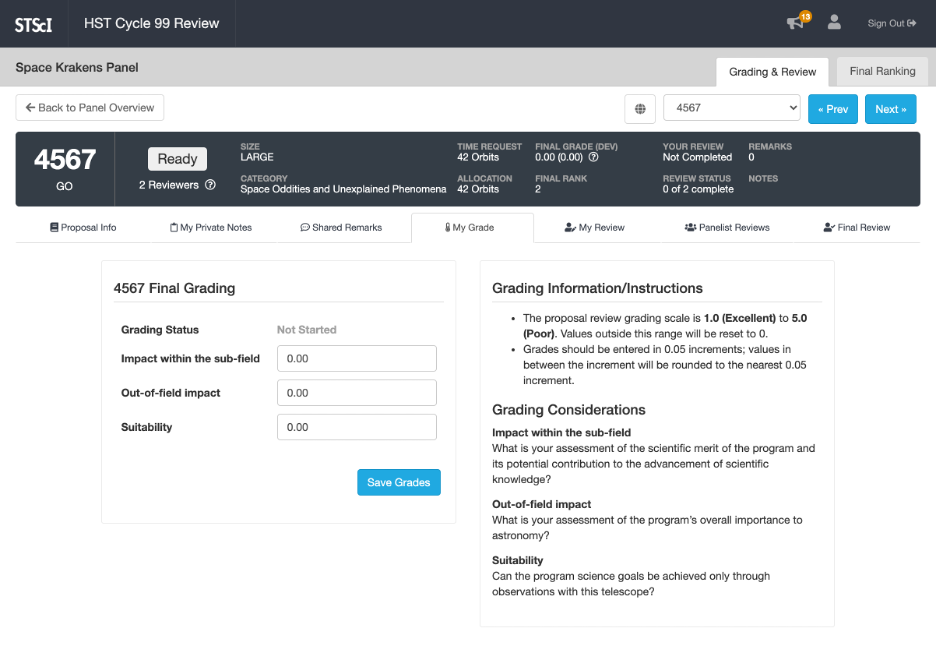
Click on the figure for a larger view.
Step 3 — Entering your grades
Enter your grade values for the proposal, referring to the grading information on the right side of the tab as necessary.
If you wish to switch to other tabs while considering your grades, you can safely do that without losing the unsaved grade values you have entered so far. The browser will warn you and prompt you for confirmation if you try to leave or refresh the page while there are unsaved grade entries.
Note that the grading form will be disabled if grades are locked or grading is no longer active. If you need to enter or amend grades when the grading form is disabled, contact the panel Chair or PSS for support.
Step 4 — Saving your grades
Click the Save Grades button to save the grades you have entered. The button becomes disabled and changes to “Saving” while the grades are saving, which can sometimes take a few moments. When saving is complete, the button will change back to Save Grades.
Entering Proposal Feedback Comments
Step 1 — Navigating to a proposal
Start by navigating to the proposal to be graded, as documented in Navigating and Viewing Panel Proposals.
Step 2 — The My Review tab
On the Proposal Page, switch to the tab labeled My Review. Note that this tab is only available on proposals for which you are assigned as a reviewer. If you do not see a tab with that label, you do not need to write a review for that proposal.
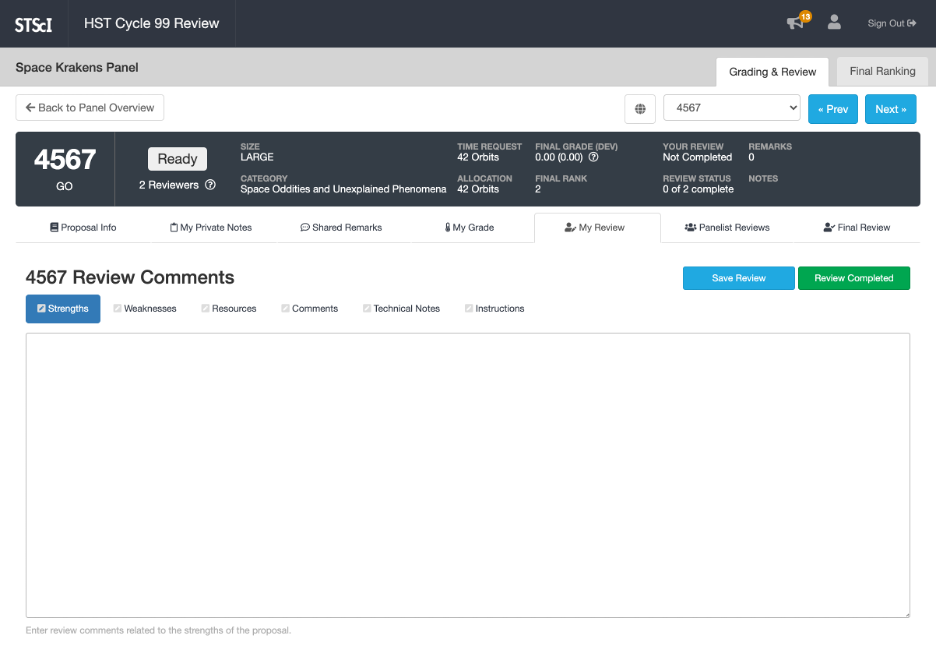
Click on the figure for a larger view.
Step 3 — Entering your proposal feedback comments
This tab has a separate text entry area for each part of your review: Strengths, Weaknesses, etc. You can switch among these areas by clicking on their labels.
Typically the Strengths and Weaknesses areas are required and the others are optional, but you may receive more specific instructions for your panel. You can tell in which areas you have already entered content by the color of the icon in its label: green means content has been entered, and gray means there is no content for that area.
If you wish to switch to other tabs while writing your proposal feedback comments, you can safely do that without losing what you have entered so far. The browser will warn you and prompt you for confirmation if you try to leave or refresh the page while you have unsaved changes to your review.
If you plan on extensive writing or editing of your proposal feedback comments, you may wish to do so in a local document on your computer instead of in SPIRIT. As with any web application, your connection to SPIRIT may be interrupted by network or service outages, both planned and unplanned. To avoid potential loss of work due to such an interruption, you can write your proposal feedback comments in a text editor or word processor on your computer, and then copy and paste them into SPIRIT when you are ready.
Step 4 — Saving your proposal feedback comments
Click the Save Review button to save all areas of the review. The button becomes disabled and changes to Saving while the review is saving, which can sometimes take a few moments. When saving is complete, the button will change back to Save Review.
Note that you do not need to complete your proposal feedback comments before saving it. Your saved comments will be treated as a draft until you mark it as complete.
Step 5 — Completing your review
When you have completed your proposal feedback comments, click the Review Completed button. This marks your comments as complete, and the Proposals & Assignments table will show “My review complete” for this proposal.
If you wish to return your comments to an incomplete status, you can click the Reopen Review button to do that. However, you may want to alert your co-reviewer, panel chair, and panel PSS if you reopen your comments, as your completed comments may already have been incorporated into the final version of the proposal feedback comments. Also, the button to reopen your comments is not available after final review sign-off.
Entering Private Notes
Words in bold are GUI menus/
panels or data software packages;
bold italics are buttons in GUI
tools or package parameters.
For your convenience, your private notes are displayed for you at the bottom of the My Review tab on proposals where you are assigned as a reviewer.
Step 1 — Navigating to a proposal
Start by navigating to the proposal to be graded, as documented in Navigating and Viewing Panel Proposals.
Step 2 — The My Private Notes tab
On the Proposal Page, switch to the tab labeled My Private Notes.
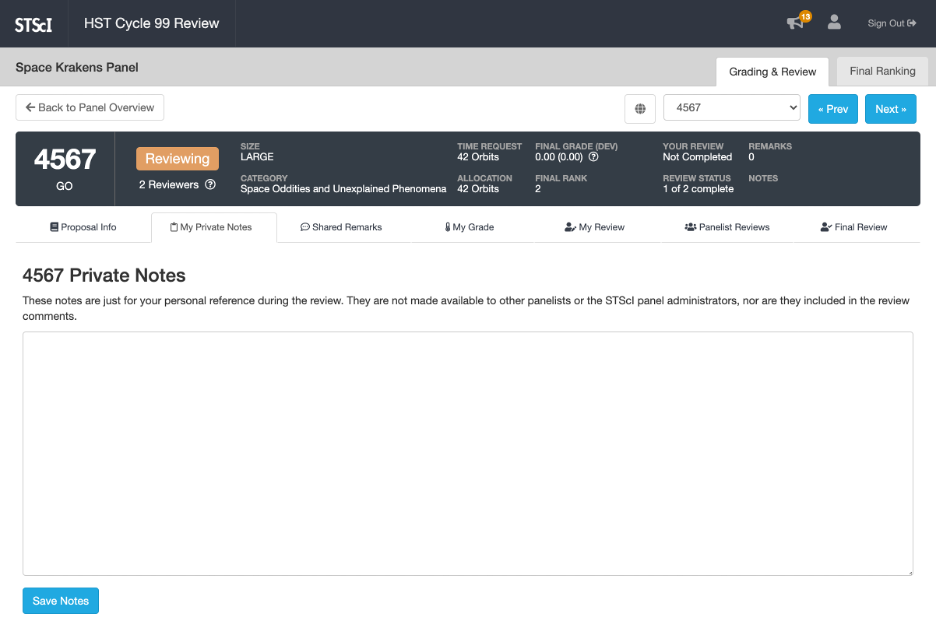
Click on the figure for a larger view.
Step 3 — Entering and saving your notes
Enter or edit your private notes as desired, then click the Save Notes button to save them. The button becomes disabled and changes to Saving while your notes are saving, which can sometimes take a few moments. When saving is complete, the button will change back to Save Notes.
Entering Shared Remarks
SPIRIT allows you to enter shared remarks on any proposal you are allowed to view, regardless of whether you are assigned as a reviewer or grader. They are intended for panel collaboration during the review process, so they are visible to other non-conflicted panelists and some STScI staff. Shared remarks are not included in the final review.
Shared remarks are not available during the preliminary grading phase, as that part of the review process is intended to be non-collaborative.
Step 1 — Navigating to a proposal
Start by navigating to the proposal to be graded, as documented in Navigating and Viewing Panel Proposals.
Step 2 — The Shared Remarks tab
Words in bold are GUI menus/
panels or data software packages;
bold italics are buttons in GUI
tools or package parameters.
The top area of this tab shows any remarks that have been made so far on this proposal, or “No remarks have been made here yet” if there are none. At the bottom of the tab there is a form for adding a remark.
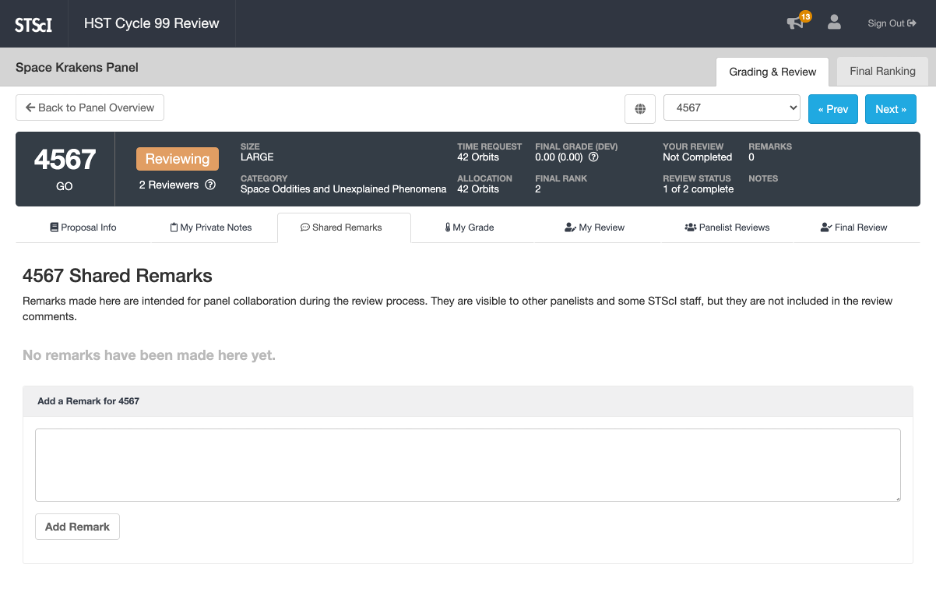
Click on the figure for a larger view.
Step 3 — Adding shared remarks
To add a remark, enter some text in the area labeled “Add a Remark …” and then click the Add Remark button. The button becomes disabled and changes to Adding while your remark is being added, which can sometimes take a few moments. When your remark has been added, the button will change back to Add Remark and the text area will be cleared.
Step 4 — Deleting shared remarks
To delete a remark you have added, click the X icon in the upper-right corner of the remark. There is currently no way to edit your remarks.
Submitting the Final Version of the Proposal Feedback Comments
Each proposal is generally assigned both a primary and a secondary reviewer, but ultimately STScI needs a single “final” version of the proposal feedback comments for each proposal. Typically the primary reviewer incorporates the secondary reviewer’s comments into their own and then submits that as the final version of the proposal feedback comments. The documentation here describes how to do that.
Step 1 — The Panel Overview Page
Start at the Panel Overview Page for a panel. You can get here from anywhere in the application by first clicking on the name of the review meeting in the navigation bar (which brings you to the review meeting Welcome Page), and then clicking one of the panels in the My Panels section on that page.
Step 2 — Checking which proposals need reviews
In the Proposals & Assignments table, look in the Review column for a proposal that says “Needs final review (primary)”. This indicates a proposal that is in need of a final version of the proposal feedback comments, and where you are assigned as the primary reviewer. Click the proposal number for that proposal to go to its Proposal Page.
If you see a proposal that says “Needs my review”, that indicates that you have not yet completed your own feedback comments for the proposal. You should complete your own comments before you submit the final version. See the Entering Proposal Feedback Comments page in this documentation for instructions on how to do that.
If you see proposals that say “My review complete” but none that say “Needs final review”, then the panel PSS has not yet enabled submission of the final version of the proposal feedback comments. Please coordinate with your panel PSS about when that will be enabled, then refresh the page to see the updated status of the proposals.
Step 3 — The Panelist Reviews tab
Words in bold are GUI menus/
panels or data software packages;
bold italics are buttons in GUI
tools or package parameters.
Coordinate with any other assigned reviewers about whether their feedback comments are complete. This should be done via Slack or face-to-face interactions, not through email. (SPIRIT does not currently show any indication of whether the other reviewers have completed their feedback comments.)
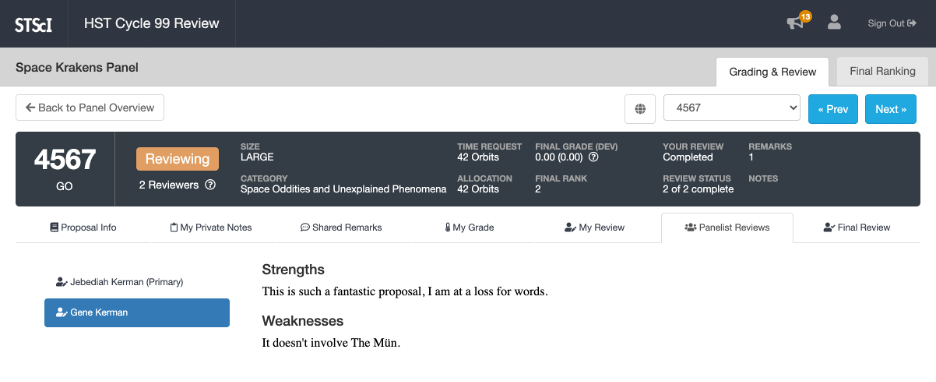
Click on the figure for a larger view.
Step 4 — Incorporating other reviewers' feedback
Once you have confirmed that the other reviewers have completed their feedback comments, it is time to incorporate their comments into your own.
Return to the My Review tab and click Reopen Review to make your review editable again. You can then copy each section of the other feedback comments from the Panelist Reviews tab and paste them into the appropriate area of your own feedback comments. You may wish to edit or reword the combined content, for example to avoid redundancy or improve the consistency.
If you need to stop work on this effort and come back to it later, you can click the Save Review button to save what you have done so far.
Step 5 — Submitting the final review
When you are done combining each section of the feedback comments, click the Submit as Final button. The button becomes disabled and changes to Submitting while the final feedback comments are being submitted, which can sometimes take a few moments. When submission is complete, the button will change back to Submit as Final.
Step 6 — The Final Review tab
Switch to the tab labeled Final Review to see the submitted final version of the proposal feedback comments.
If you need to make minor edits to the final proposal feedback comments after submitting it, you can simply return to the My Review tab, click Reopen Review, and then after making your edits click Submit as Final again.
If you need to make more extensive edits, it is recommended that you first un-submit the final version of the proposal feedback comments by clicking the Revert to Reviewing button on the Final Review tab. You can then reopen, edit, and re-submit as described in the previous steps.
If the Revert to Reviewing button is not available on the final version of the proposal feedback comments, that generally means the panel chair or a panel PSS has already signed off on the final version. You would need to contact them about making any changes at that point.
Viewing Final Ranking
Step 1 — The Panel Overview Page
Start at the Panel Overview Page for a panel. You can get there from anywhere in the application by first clicking on the name of the review meeting in the navigation bar (which brings you to the review meeting Welcome Page), and then clicking one of the panels in the My Panels section on that page.
Step 2 — The Final Ranking Page
Words in bold are GUI menus/
panels or data software packages;
bold italics are buttons in GUI
tools or package parameters.
If and when the panel has been ranked, this page displays a table of the rankings:
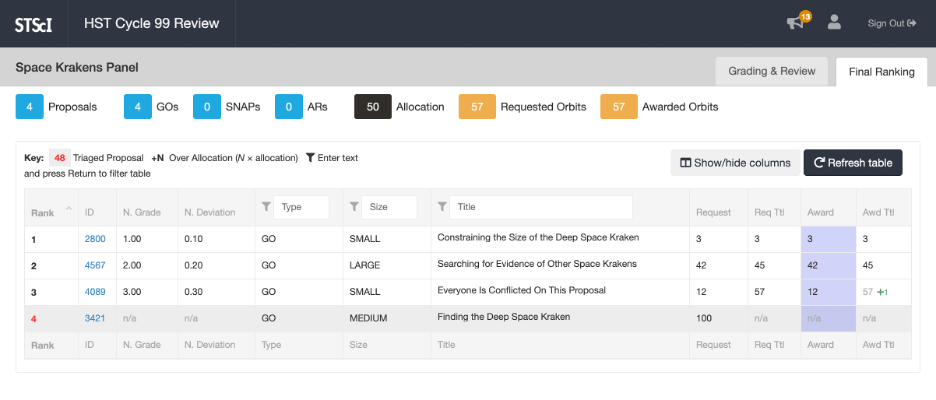
Click on the figure for a larger view.
Step 3 — Viewing the final rankings
You can customize which columns are displayed by clicking the Show/hide columns button above the table.
Some columns support filtering, which is indicated by a funnel icon and an editable text field in the column heading. After changing or clearing the filter text, you need to press Enter (PC) or Return (Mac) for the change to take effect.
The Refresh table button provides a quick way to see the latest changes made by the panel administrator to the ranking and time allocations.